The Kettlebell Windmill combines strength, flexibility, and stability to elevate your fitness routine. Whether you’re a seasoned fitness enthusiast or just starting your wellness journey, mastering the Kettlebell Windmill can unlock a world of benefits.
In this article, we’ll delve into the intricacies of this exercise, breaking down its technique, highlighting its muscle-engaging prowess, and underlining its role in enhancing core strength. Join us as we uncover the steps to execute the perfect Kettlebell Windmill with precision, ensuring you make the most out of this dynamic addition to your workout arsenal. Ready to enhance your fitness repertoire? Let’s dive in!
Kettlebell Windmill Muscles Worked
In terms of muscles, we need to think about mobility and stability first. It will challenge the mobility of your lateral hip and thoracic rotation whilst challenging the stability of your shoulder itself.
So, what muscles does the kettlebell windmill work?
The muscles worked are your core, obliques, shoulders, and glutes. Improving flexibility in your hamstrings and hips as well (let’s face it, a common problem for those a bit stiff!) makes this kettlebell exercise the go-to exercise for many.
Do windmills build muscle? The answer is no, but you incorporate these with your other movements like kettlebell cleans and kettlebell presses you will naturally be able to improve muscle mass whilst also focusing on injury prevention.
Related Posts:
- Kettlebells: The Ultimate Guide To Strength Training
- 28 Kettlebell Exercises You Must Master
- Learn the kettlebell clean | The Definitive 6 step Guide
- Get a better Kettlebell Press with these 5 tips
- Master the kettlebell snatch in 5 steps
- 5 Steps To A Better Turkish Get Up
- Improve your Kettlebell Swing with these 6 Steps
Benefits of kettlebell windmill
For beginners, it’s great; this exercise has the added benefit of being relatively easy to learn compared to other more advanced exercises that require a complicated form or heavy weights.
Complimentary benefits include increased mobility, stability and durability. The kettlebell windmill is a powerhouse of an exercise that should be one of the first you take action on master and incorporate into your routines.
Training Program focused on Kettlebell exercises
Check out our Kettlebell 66 Program! An easy to follow training program for those who like kettlebell exercises.


How to master your kettlebell windmill technique in 3 steps:
Step 1 – The stick stretch
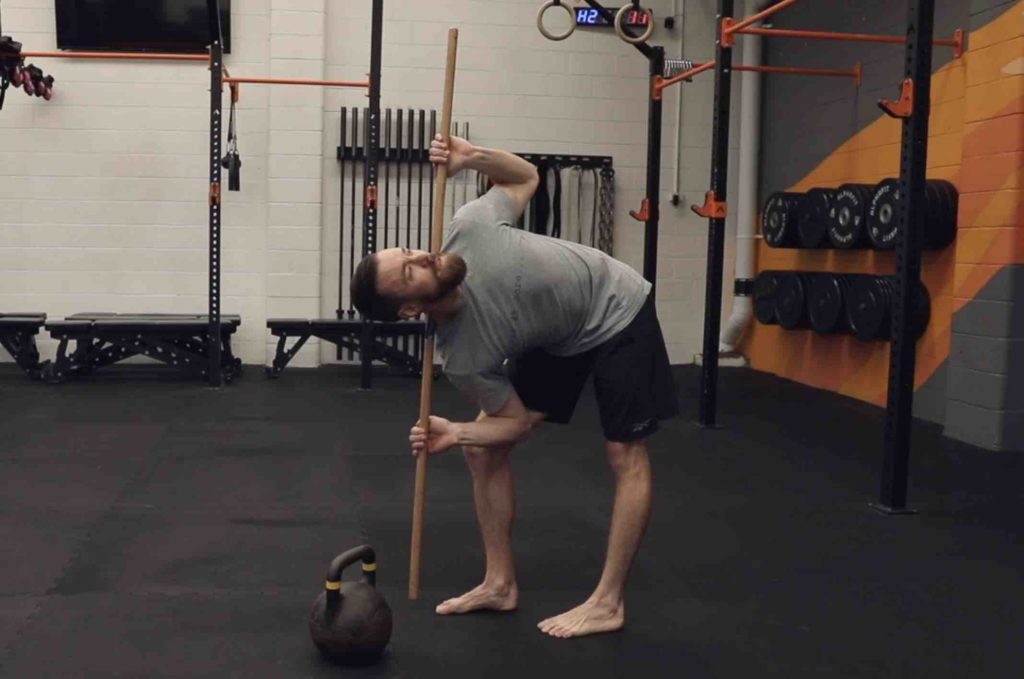
Dan John taught me the stick stretch to me in his Melbourne workshop. We covered so many little gems of knowledge that it’s hard to remember them all! Let’s take a look at the stretch as it’s a perfect way to start the kettlebell windmill with no weights.
Using a dowel held on your shoulders like a barbell squat, rotate into the kettlebell windmill position, making sure to tuck your elbow into the inside of your front leg near the knee. Hold for 30 seconds to a minute and then come out of the position and change sides.
By not adding load and focusing on prying yourself open on the inside of your thigh, you can increase your range of motion and assess if you’re ready to progress to the half kneeling kettlebell windmill.
Watch a demo of the stick stretch here.
Step 2 – Half kneeling windmill
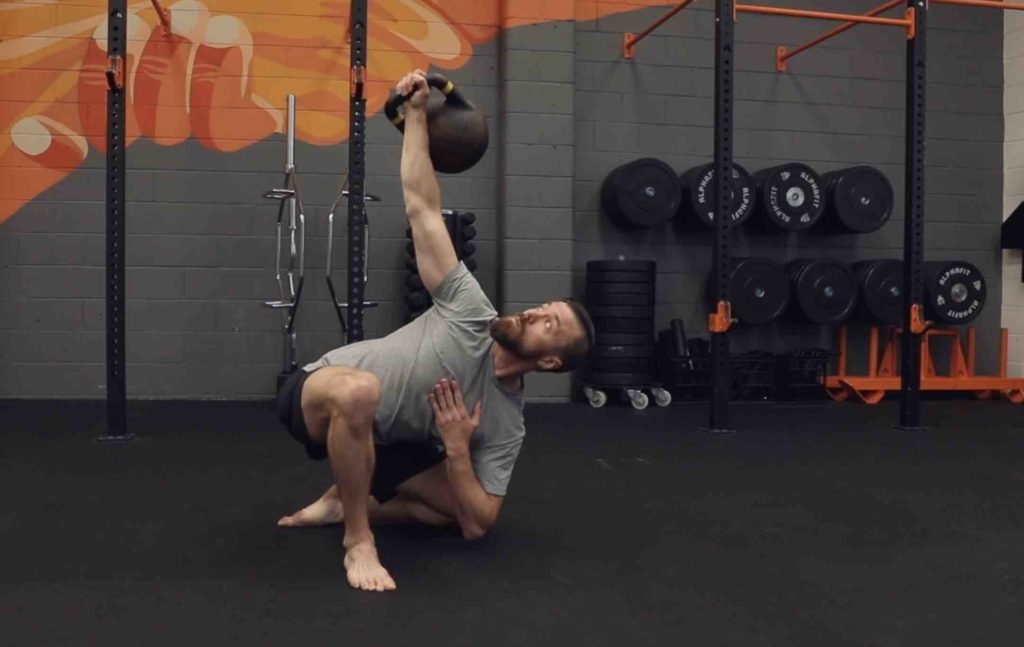
Using our floor-to-standing approach, which you learn in Unlock Your Movement, start the kettlebell windmill in a half kneeling position and windshield wiper your back foot behind you. Suck your shoulder to your hip, rotate and kick into the hip movement. Lower yourself so that your elbow meets the floor. Squeeze your glutes and drive up into the top position.
You can begin this movement without any weights, adding them on once you feel confident with the exercise.
By performing the kettlebell windmill in a kneeling position, you take limiting factors such as balance, lower limb and hamstring mobility issues out of the equation. Focusing on the trunk rotation and shoulder mobility/stability allows you to assess and work on any problems you find. It also lets you get confident under the kettlebell in a lateral movement as you are closer to the ground and there are fewer moving parts.
If you find shoulder mobility and stability limiting factors, drills like the kettlebell arm bar will help you get closer to the floor.
You can watch a demo of the half kneeling windmill here
Step 3 – Standing kettlebell windmill
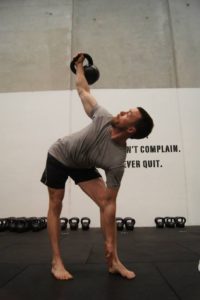
Once you have mastered the half kneeling windmill position, you can move to a standing position. You will need to focus on a few key elements when learning how to do a kettlebell windmill:
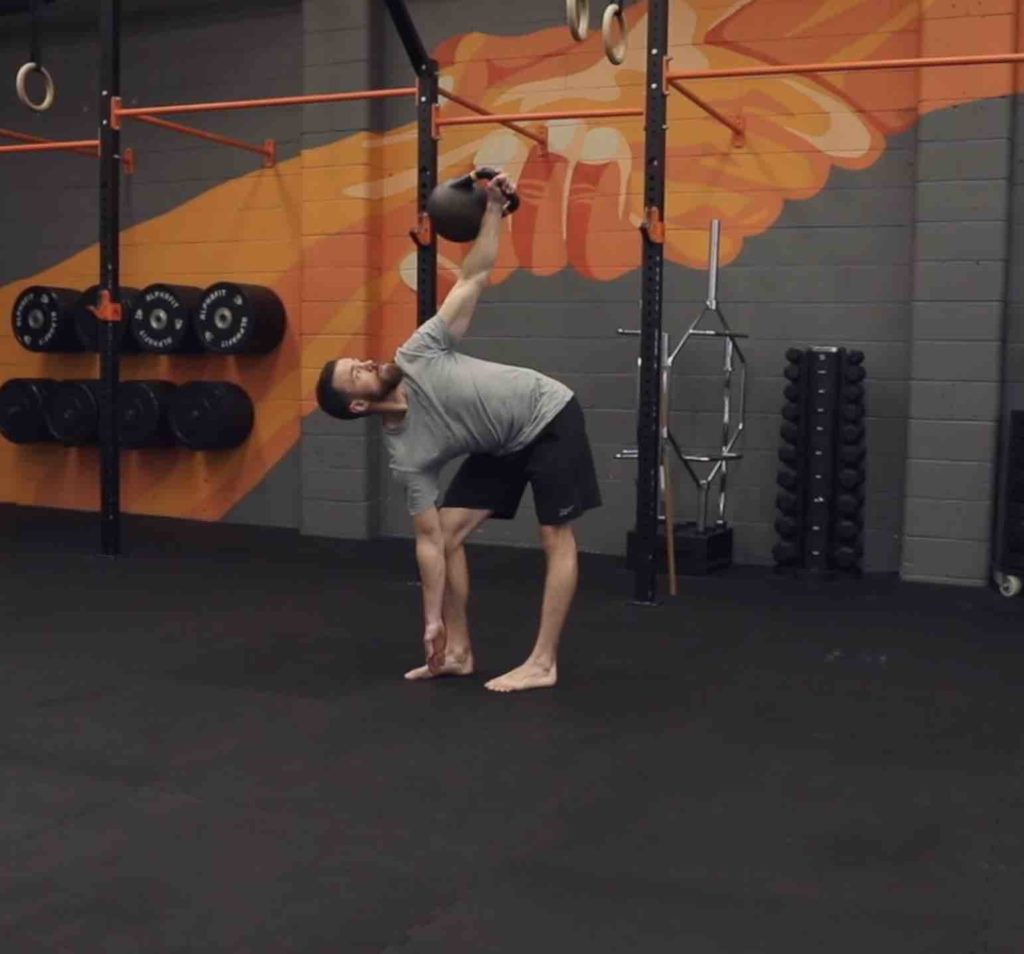
- Turn your feet on 45 degrees facing the same way
- Rotate toward the back hip before adding flexion. It’s not about spinal torque but trunk rotation and hip flexion
- Keep your lat sucked to the hip throughout the movement. If you break that connection, come back to the start
- Work slowly to the floor. It’s not a rush
- Begin with small reps. Don’t add fatigue until you’ve mastered the technique
Remember, the perfect kettlebell windmill doesn’t require a lot of weight. Of course, you can add weight once your technique is excellent, but you will see the benefits of the exercise long before that.
Adding lateral movements and strength training are often the missing pieces to the puzzle regarding injury-proofing your body. So if you’re always getting injured, struggle with mobility or are in pain, it might be time to take you out of the symmetrical stance and add the kettlebell windmill into your life.
Kettlebell windmill alternatives and variations
Once you have the standing kettlebell windmill down, you can progress into more advanced kettlebell windmill exercises such as the double kettlebell windmill.
Suppose you find that this exercise is too strenuous or not challenging enough for you. In that case, there are plenty of kettlebell windmill alternative exercises that can help target the same muscle groups. Some favourites include the Turkish get up, loaded carry and the standing oblique crunch with a kettlebell. However, be sure to consult with a professional before trying any of these exercises if you are starting out with kettlebell workouts.
A Kettlebell Windmill Workout
For those wanting to put all of this together here’s a windmill workout that will help you master the movement by stages.
Warm up with your stick stretch for 30 seconds each side for three rounds, try and increase the range of movement each time.
Then complete 5 rounds of the following;
5 Half kneeling windmills on one side, without placing the kettlebell down lunge up to standing. From there, complete 5 standing windmills on the same side.
You can either then return to half kneeling to complete 5 more reps or place the kettlebell down and begin from the other side.
The kettlebell windmill exercise is a great way to work on your balance and overall strength while also working up quite a sweat! Remember when attempting this new workout that it takes perseverance to master the kettlebell windmill; however, there’s no looking back once learned! This super simple move can be an excellent addition to many different training regimens – especially for beginners who want something light yet effective. So, what are you waiting for? Get to it!
